
Contents
As the scale of your game increases, tracking all the objects or entities being used becomes increasingly difficult. There may also be situations where you need multiple copies of the same object. For instance, coins in a level or bullets fired from a gun. One solution to this problem is to use Prefabs.
Overview
Prefabs are templates or blueprints of a GameObject that can be used in other parts of the game. This template is stored in your project as an asset file which can later be used wherever required.
Prefabs greatly improve the game development process by speeding up development and simplifying debugging. To understand their usage, consider coins (or any pickup) in a game. Let’s say you need to place 20 coins in level. Your initial approach would be to
- Create a
Coinobject - Make multiple copies of that object
- Place them throughout the level
After you’ve done this, you realize that you want to change the color of each coin. Because we simply made copies, the color of each coin would have to be manually updated. This process can be bypassed using prefabs. Now your approach would be
- Create a
Coinobject - Save it as a prefab
- Place the prefab throughout the scene
Each coin now is an instance of the prefab. This means that if you change the color in the coin prefab asset, every instance placed in the level would automatically use the new color. Because of the same reasons, prefabs can be helpful while debugging your game. If there’s a bug that’s affecting all coins, chances are that fixing it in the prefab will fix it for all coins in the scene. It is clear now that prefabs provide a powerful mechanism to allow reusing content.
Common Usage
Creating and Editing Prefabs
The game engine’s UI allows users to create prefab assets. As mentioned earlier, these contain all the information necessary to create a GameObject of a particular type, namely:
- All components of the object
- All child objects and their components
- All data fields related to these components
The second point above describes how GameObjects can be nested. For example, you can create a Gun prefab that will be used by both Player and Enemy prefabs. The bonus content below describes this situation in more detail.
Manual Placement in Scenes
Prefabs can be manually placed in your scenes to be used. This is what we did when we placed coins on the map. This is done in the engine’s level editor UI usually by dragging the asset into the scene, moving and duplicating as you see fit.
Initialization During Runtime
Prefabs can be created dynamically as your game runs based on user input or other events (such as the Bullet prefab being spawned when a gun is fired). Let’s take two examples
- A bullet is fired when
Spaceis pressed
GameObject bulletObject; // Stores a reference to the bullet prefab asset

void Update()
{
    // Checks if Space Key is Just Pressed down
    if(Input.GetKeyDown(KeyCode.Space))
    {
        // Spawns a bulletObject at the location (1, 1, 1)
        Initialize(bulletObject, Vector3(1, 1, 1));
    }
}
- Spawn an enemy at a random position at regular intervals
GameObject enemyObject; // Stores enemy prefab reference

void Update()
{
    // Calculate time left to wait
    float timeLeft = GetTimeLeft();

    // Spawn if the wait is over
    if(timeLeft <= 0)
    {
        Vector3 spawnPosition = GetRandomPosition(); // Get Random Spawn Position
        Initialize(enemyObject, spawnPosition); // Spawns Enemy at said Random Position
        timeLeft = ResetTimer(); // Reset the timer, start the waiting period again
    }
}
Overriding Prefab Data
All instances of the prefab share the properties configured in the original asset. We can also tweak these values per-instance if needed. By overriding a value in an instance you indicate that value to be different. Consider a situation where you’re implementing a sword, with an Attack parameter initially set to 5 (figure a).
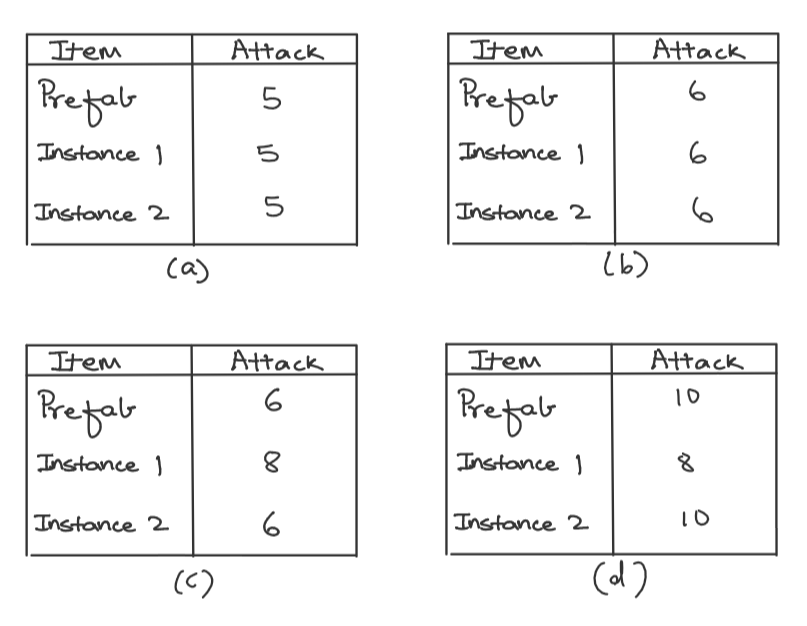
This sword is shared by multiple characters in your game, but you want to give one of them a slight advantage. Changing the prefab asset will change the parameter for all instances (figure b). What we need to do instead is to override the parameter for instance 1 (figure c). Changing the prefab now will affect all instances except instance 1 (figure d).
Prefab Variants
Overriding works well with a small number of objects. However, as the number of objects increases, using prefab variants becomes the much simpler option. To understand this, lets take the example of a healing potion.
- A
HealthPotionheals the user by a certain amount when used. - You can have Multiple Types of Prefabs as:
- Small Potion (heals 5 HP)
- Normal Potion (heals 15 HP)
- Large Potion (heals 50 HP)
- All of these items have the same logic just with different parameters. All of these can have multiple instances in multiple parts of the game
Using prefab variants we can easily tackle this situation
- Save a
HealthPotionobject as prefab - Create three prefab variants of this potion:
SmallHealthPotion,NormalHealthPotionandLargeHealthPotion- These variants themselves are stored as asset files and can be used in the game
There is now a hierarchy. A change to SmallHealthPotion will be propagated to all instances of that variant. A change to HealthPotion will be propagated to all instances of all variants. If you want to add a sparkle effect on your health potions, you only need to add it to the original HealthPotion prefab.
Bonus Content: Nested Prefabs
Prefabs can also be nested inside other prefabs. These can be used to divide the development process into smaller, manageable parts. Let’s take the example of an RPG game with enemy characters with weapons. The features of the game are
- There are enemy characters which can be found throughout the world (Ex - Raider)
- Each enemy also has items such as
- Weapons (Ex - Sword, Shield, Axe)
- Armor (Ex - Helmet, Leather Armor)
- Other (Ex - Potions, Coins)
- This equipment can also be used by other enemies (Ex - Guard) or by the player
We’ll create the following prefabs:
- Player
- Raider
- Guard
- Sword
- Shield
- Axe
- Helmet
- Leather Armor
- Potion
- Coin
These prefabs can be created individually during the development process and can be put together in the form of prefabs. They are finally assembled into objects in the context of the game such as
Prefabs
│   Coin
│   Potion
|   Leather Armor
|   Hemlet
|   Axe
|   Shield
|   Sword
└───Raider
    │   Sword
    |   Leather Armor
    |   5 Coins
└───Guard
    │   Sword
    │   Shield
    │   Helmet
    |   Leather Armor
    │   1 Potion
    |   10 Coins
└───Player
    │   Axe
    │   Shield
    │   Helmet
    |   Leather Armor
    │   3 Potion
    |   25 Coins
The Raider, Player and Guard prefabs use the same weapon and armor prefabs.
Parent-Child Relationship
When nesting prefabs, we have objects that contain other objects. This forms a parent-child relationship between these objects. The child inherits multiple properties from its parents such as
- Position
- Rotation
- Scale
- Colliders


