
A noise generation library written in C++ using the stb_image library for rendering to an image. The noise maps utlize procedural random number generators for generate random numbers. These are mapped to a 2D Array of pixel data which can be converted into a .png file.
Various noise maps which can be generated using the library:-
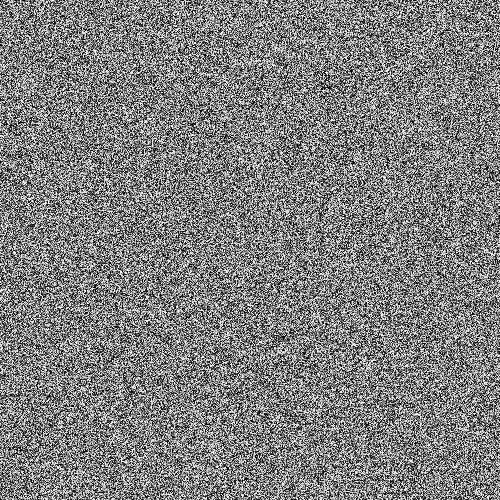
Generated a 2D array of pixels with each pixel having a value between 0.0 to 1.0. The value of 0.0 represents black, and a value of 1.0 represents white.
Code sample for the random noise generation:-
// noise.h
float *get_noisemap(int rows, int columns)
{
    float *noiseMap = new float[rows * columns];
    for (int y = 0; y < rows; y++)
    {
        for (int x = 0; x < columns; x++)
        {
            noiseMap[(y * columns) + x] = get_random_noise();
        }
    }
    return noiseMap;
}
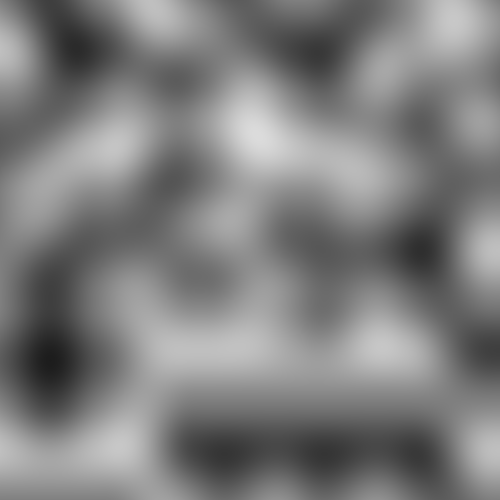
The values of each pixel in a Perlin noise map depend on the X and Y coordinates of that pixel. Nearby pixels will have similar values, ranging between 0.0 and 1.0.
Code sample for the perlin noise generation:-
// noise.h
float *get_noisemap(int rows, int columns, float scale)
{
    ...
    PerlinNoiseGenerator pn(seed);
    for (int y = 0; y < rows; y++)
    {
        for (int x = 0; x < columns; x++)
        {
            float sampleX = (x / scale);
            float sampleY = (y / scale);
            float noiseVal = get_perlin_noise(sampleX, sampleY, &pn);
            noiseMap[(y * columns) + x] = noiseVal;
        }
    }
    return noiseMap;
}
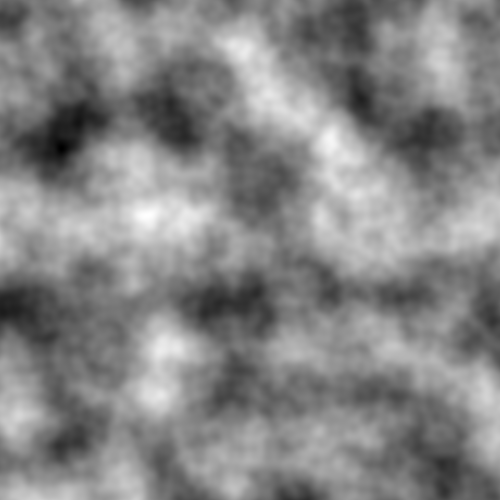
Multiple layers of perlin noise can be layered upon one another to create octave noise. Each layer will have a smaller amplitude and a higher frequency. These layers are scaled in the range of [-1, 1] and added to each other. The final octave noise is obtained and scaled to the range of [0, 1].
Code sample for the octave noise generation:-
// noise.h
float *get_noisemap(int rows, int columns, float scale,
                    int octaves, float persistence, float lacunarity, float xOffset = 0, float yOffset = 0)
{
    ...
    for (int y = 0; y < rows; y++)
    {
        for (int x = 0; x < columns; x++)
        {
            float amplitude = 1;
            float frequency = 1;
            float noiseVal = 0;
            for (int i = 0; i < octaves; i++)
            {
                float sampleX = (((x - halfX) / scale) * frequency) + octaveOffsets[(i * 2)];
                float sampleY = (((y - halfY) / scale) * frequency) + octaveOffsets[(i * 2) + 1];
                float noise = (get_perlin_noise(sampleX, sampleY, &pn) * 2) - 1;
                noiseVal += noise * amplitude;
                amplitude *= persistence;
                frequency *= lacunarity;
            }
            maxNoise = max(maxNoise, noiseVal);
            minNoise = min(minNoise, noiseVal);
            noiseMap[(y * columns) + x] = noiseVal;
        }
    }
    ...
    for (int y = 0; y < rows; y++)
    {
        for (int x = 0; x < columns; x++)
        {
            noiseMap[(y * columns) + x] = inverse_lerp(noiseMap[(y * columns) + x], minNoise, maxNoise);
        }
    }
    return noiseMap;
}
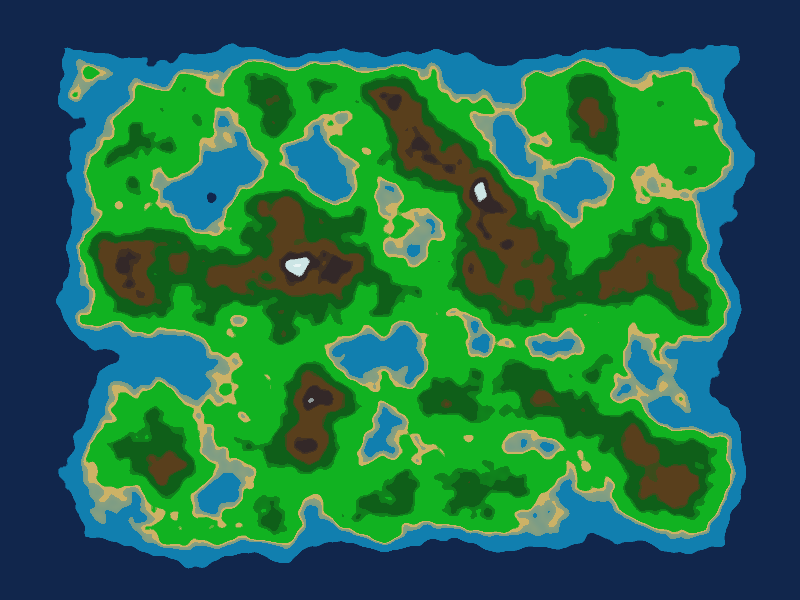
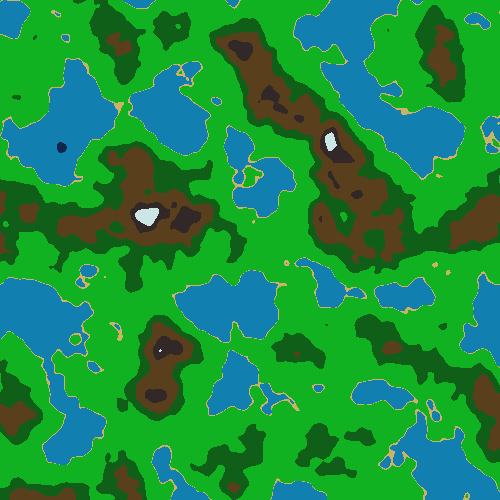
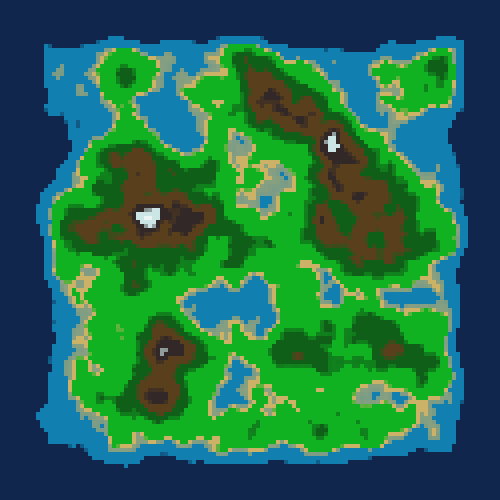
A color map of the octave noise can be created by defining thresholds for the noise values. Each region has a color value and a minimum height. Based on the noise value of a given pixel, we find the region and assign a color value to that pixel.
Code sample for the color map generation:-
// config.h
..
#define DARK_BLUE Colorf(0.07f, 0.15f, 0.3f)
#define OCEAN_BLUE Colorf(0.07f, 0.5f, 0.69f)
#define DARK_YELLOW Colorf(0.8f, 0.7f, 0.4f)
#define LAND_GREEN Colorf(0.07f, 0.7f, 0.13f)
#define DARK_GREEN Colorf(0.06f, 0.375f, 0.1f)
#define LIGHT_BROWN Colorf(0.35f, 0.25f, 0.11f)
#define DARK_BROWN Colorf(0.2f, 0.16f, 0.16f)
#define LIGHT_BLUE Colorf(0.80f, 0.9f, 0.9f)
...
// mapgen.h
const MapSection mapSections[MAP_REGIONS] = {
    MapSection(DARK_BLUE),
    MapSection(OCEAN_BLUE, 0.05f),
    MapSection(DARK_YELLOW, 0.37f),
    MapSection(LAND_GREEN, 0.4f),
    MapSection(DARK_GREEN, 0.6f),
    MapSection(LIGHT_BROWN, 0.725f),
    MapSection(DARK_BROWN, 0.85f),
    MapSection(LIGHT_BLUE, 0.925f)};

int get_index_from_height(float height)
{
    int n = 0;
    for (int i = 0; i < MAP_REGIONS; i++)
    {
        if (mapSections[i].height > height)
        {
            break;
        }
        n = i;
    }
    return n;
}

Colorf get_color_from_sections(float height)
{
    return mapSections[get_index_from_height(height)].col;
}
A falloff map can be generated by applying a maximum function to the absoulte pixel coordinates. This can be further altered by applying the function:- [x ^ a / (x ^ a + {b * (1 - x)} ^ a)]
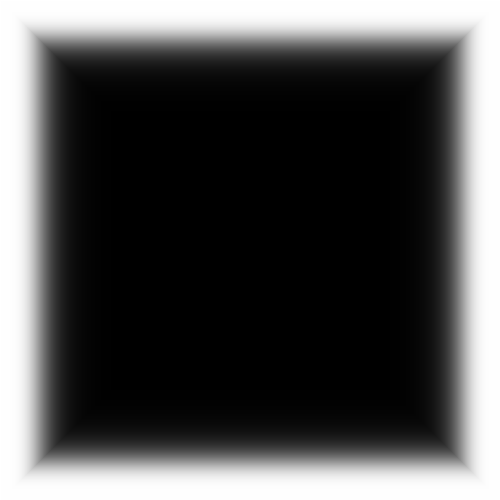
Code Sample for falloff map generation:-
// noise.h
float eval_falloff_value(float val, float curve, float shift)
{
    float a = curve;
    float b = shift;
    val = pow(val, a) / (pow(val, a) + pow(b - (b * val), a));
    return val;
}

float *get_falloffmap(int rows, int columns, float curve, float shift)
{
    float *falloffmap = new float[rows * columns];
    for (int i = 0; i < rows; i++)
    {
        for (int j = 0; j < columns; j++)
        {
            float y = ((float)i / rows) * 2 - 1;
            float x = ((float)j / columns) * 2 - 1;
            float val = max(absolute(x), absolute(y));
            falloffmap[(i * columns) + j] = clamp(eval_falloff_value(val, curve, shift));
        }
    }
    return falloffmap;
}
The falloff map can be subtracted from the octave noise map to get a closed noise map.

This noise map can be used to create a color map. The color maps will be covered from all sides to get a more usable map.
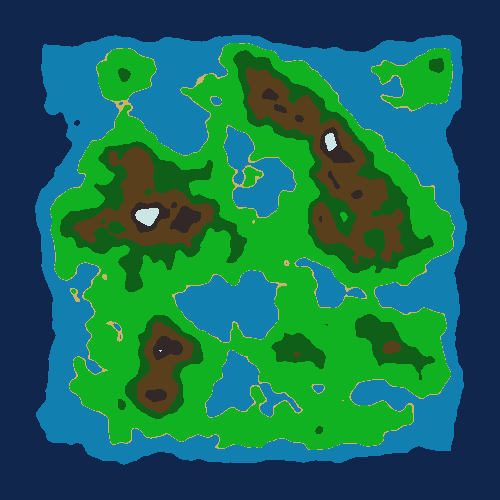
The value for a pixel in a color map is region-dependent. If the value is 0.30 or 0.32, the color value will be same if they lie in the same region. A better solution would be to interpolate the color value between the color values of adjacent regions.

Code Sample for the color blending in color map:-
// mapgen.h
Image get_colormap(TextureData *texData)
{
    ...
    for (int i = 0; i < rows; i += 1 + imgLOD)
    {
        for (int j = 0; j < columns; j += 1 + imgLOD)
        {
            ...
            for (int newI = i; newI <= iEnd; newI++)
            {
                for (int newJ = j; newJ <= jEnd; newJ++)
                {
                    float height = texData->tex[texIndex];

                    int index = get_index_from_height(height);
                    Colorf col = mapSections[index].col;
#if BLEND_REGIONS
                    int indexB = index + 1;
                    float h2 = 1.0f;
                    Colorf col2(1.0f);
                    if (indexB < MAP_REGIONS)
                    {
                        h2 = mapSections[indexB].height;
                        col2 = mapSections[indexB].col;
                    }

                    float off = inverse_lerp(height, mapSections[index].height, h2);
                    if (off > BLEND_THRESHOLD)
                    {
                        Colorf mixCol = col_lerp(col, col2, off);
                        col = col_lerp(col, mixCol, BLEND_FACTOR);
                    }
#endif
                    int imgIndex = texData->get_index(newI, newJ);
                    img[imgIndex] = get_color(col);
                }
            }
        }
    }
    ...
}
Comparision with color maps with no blending(left) and one with blending(right):-
For the output image, we can define Levels of Detail (LOD) so that adjacent pixels share the same values. This leads to smaller files sizes and fewer number of calculations to be done.
Code sample for defining LODs for output image:-
// mapgen.h
Image get_colormap(TextureData *texData)
{
    int imgLOD = texData->lod - 1;
    int rows = texData->rows;
    int columns = texData->columns;
    Image img = new Colori[rows * columns];
    for (int i = 0; i < rows; i += 1 + imgLOD)
    {
        for (int j = 0; j < columns; j += 1 + imgLOD)
        {
            int texIndex = texData->get_index(i, j);
            int iEnd = clampi(i + imgLOD, 0, rows - 1);
            int jEnd = clamp(j + imgLOD, 0, columns - 1);
            for (int newI = i; newI <= iEnd; newI++)
            {
                for (int newJ = j; newJ <= jEnd; newJ++)
                {
                    ...
                    int imgIndex = texData->get_index(newI, newJ);
                    img[imgIndex] = get_color(col);
                }
            }
        }
    }
    return img;
}
For texData->lod = 1, we get imgLOD = 0. Thus the for loop will increment as normal, otherwise it will increment with imgLOD more. This is shown as:-
// mapgen.h

// A. Without LODs
for (int i = 0; i < rows; i++)
{
    for (int j = 0; j < columns; j++)
    {
       ...
        for (int newI = i; newI <= iEnd; newI++)
        {
            for (int newJ = j; newJ <= jEnd; newJ++)
            {
                ...
                int imgIndex = texData->get_index(newI, newJ);
                img[imgIndex] = get_color(col);
            }
        }
    }
}

// B. With LODs
for (int i = 0; i < rows; i += 1 + imgLOD)
{
    for (int j = 0; j < columns; j += 1 + imgLOD)
    {
       ...
        for (int newI = i; newI <= iEnd; newI++)
        {
            for (int newJ = j; newJ <= jEnd; newJ++)
            {
                ...
                int imgIndex = texData->get_index(newI, newJ);
                img[imgIndex] = get_color(col);
            }
        }
    }
}


